Hiya, I’m Amy and this is my pooch Whisky! Whisky is a miniature long-haired dachshund. He is born in South Wales and explores anywhere his little legs allow him to. This little sausage loves to rock up and be as stylish as possible with his many outfits including bandanas, bows, denim jackets, coats and fancy fleeces – mostly made by me at Pooch Bandana!
Today I’m sharing my tips on how to create your own up-cycled dog Bandana!

Reducing our Carbon Pawprint
To put it simply, Upcycling is a form of recycling. … Because upcycled clothing uses significantly less raw materials, it massively reduces the harmful impacts of fashion production. Such as less water usage, fewer chemicals, and less carbon emissions.
Given the state of the planet, many of us are trying to buy less and less new stuff. After all, buying new only creates demand for a whole supply chain of destruction, from planting heavily sprayed monoculture crops like cotton to pouring toxic dyes into rivers.
Yet there is a conundrum: if we buy less, that’s great for the planet but bad for not only the economy overall but the millions of people who rely on the manufacturing industries for their livelihoods. So how can we maintain economic growth without being destructive?
There are ways – and upcycled fashion is one of them.

Why Upcycle?
In case you’re not familiar with the upcycling fashion concept, it involves using pre-existing clothing, accessories, or other items and restructuring them into new garments. Think of old sweaters being unraveled and the yarn being refashioned into new ones, or scraps of fabric waste from car interiors being used to make handbags. Deadstock, otherwise known as fabric that’s leftover from the fashion industry, can also be used to make new clothing.
There are plenty of benefits to this, including:
- Sustainability – Upcycling reduces clothing and textile waste by reusing deadstock or gently used fabric to create new garments and products.
- A Cheaper Wardrobe – Upcycling can be less expensive since used or pre-existing materials are typically a fraction of the cost of newly-made materials and textiles.
- Uniqueness – Upcycling requires creativity to envision the potential of existing materials to create something new and beautiful.
How to create your own upcycled dog bandana
Suitable for: Beginners
Time to make: 15-30 mins (with procrastination time)
You Will Need:
- Scissors
- Cut fabric – jersey cotton, cotton, old t-shirts, bed sheets.
- Old Shirt
- A3 Paper / grease proof paper
- Sewing machine (or hand sew if determined but this will take a while)
- Hemming Web
- Snap fastener (Ebay – great place to look – a starter set is around £10+)
- Alternative – Velcro

Template : For the pattern
- 1 sheet of A3 paper or 2 sheets of A4 paper. OR a sheet from a newspaper – everyone has those, surely. (I used a template that I’ve created for Pooch Bandana so the tutorial I will keep as a simple template for those who have limited resources can also be creative)
- Scissors
Template with Paper
Take a sheet of A3 paper and fold the bottom right corner up until the bottom of the paper lines up with the left edge of the paper. This should give you a nice triangle. If you don’t have A3 paper, tape two pieces of A4 paper together along the length. Or use a sheet of A3-looking newspaper.

Fold the bottom left corner up so that the sides of the resulting triangle line up. Look at the photo. It speaks a thousand words. You are basically looking to fold the previous triangle in half…aargh. So difficult to explain with words.

Mark the neckline as indicated in the photo below. It doesn’t matter exactly how much you slant the neckline. Just slant it some. Cut on the dotted line and remove the pattern.

Finally fold the pattern in half along the fold and cut the top two corners off. Open your pattern up and admire your pattern-making abilities.
You will have a pattern that is roughly 5″ (26 cm) along the bottom sides. (This size is ideally a XS)
Making the Bandana
Lay your pattern on your fabric and cut out 2 pieces – one for the front and one for the back.

Turn the fabric over so that the right sides are together and the wrong sides of the fabric are facing out.
Starting anywhere around the edge of the bandana, sew a 1/4″ seam, stopping about 2″ before you get back to the point you started at. You will need this 2″ gap to turn the bandana right-side around. You will struggle to go wrong with this. Just keep the right edge of your sewing foot lined up with the edges of the fabric and sew, sew, sew. When you get to a corner, turn. When you’re almost back at the beginning, stop.
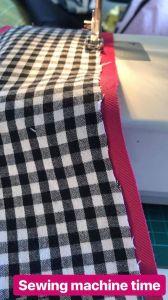
I usually stop and start more or less in the middle of the top of the bandana because this bit is mostly hidden when the dog wears it and so you can fudge as much as you want with impunity.
You can also put it on an edge so it is easily hidden.
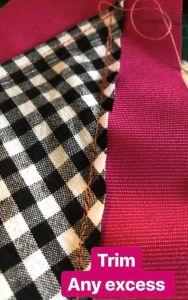
Turn the whole thing right-side out. You can iron it if you want to. I find it a lot better to close the gap when the bandana is ironed.

Closing the gap
- Choice 1 – Hemming web
- Choice 2 – top stitch all around the bandana. Most of you will know what top-stitching is. For those of you who don’t, read on and I will explain.
- A top stitch is just like a seam, but it is done on the outside of the garment (the side that will ultimately show) and just inside of the sewn edges. The idea is to sew about 1/8″ in from the sides (if your original seams were 1/4″), thus catching all the layers of fabric (and seam) to prevent fraying. Not only will this prevent fraying if done even remotely right, but it will also give your finished item a more professional look.
Lastly, sew on your Velcro or attach poppers. Don’t put both of them on the same side of the bandana(that is, don’t put both on the front or both on the back). One goes on the front of one corner and one goes on the back of the other corner.
If you accidentally mess up, no biggie. Just undo and redo.
Poppers can be harder to play about with if you mess up. Always make sure on one side of the bandana you have a flat side and a male or female joint connection ( the bits that join together so they stay in place).

Finished Product!


Download a Sizing Guide
Download a Bandana Sizing Guide
Follow Whisky’s adventures via Instagram @whiskysausagedog or follow Amy at @poochbandana!
Do you upcycle and create accessories for your dog? Share your creations below!

I love this article. So happy to see it go live.
I love this! It looks so fun, I love crafting and make lots of things for my dogs (toys, collars, leads, bowls, ID tags ect) but never a bandana. We may have to give it a go some time, I haven’t used a sewing machine since school though so that will be……interesting! haha